
How To Guide: DIY Built-in Refrigerator
Do you dream of having a high end built-in refrigerator in your kitchen? If so, look no further! With this "how to" guide, we'll walk you through the process of creating a customized DIY built-in refrigerator that fits perfectly in your kitchen—from start to finish. With helpful tips, techniques and product recommendations along the way, you'll have a custom built-in refrigerator at a fraction of the cost of a true built-in. So let's get started on creating a stunning statement piece for your home!
Quick links:
The benefits of a DIY built-in refrigerator vs. a true built-in refrigerator
Build the Refrigerator Cabinet
The benefits of a DIY built-in refrigerator vs. a true built-in refrigerator
There are several reasons you might consider a DIY Built in refrigerator. Below are just a few.
1. Save thousands of dollars on initial investment
2. Lower maintenance costs
3. Increased storage volume
4. Ease of replacement
Do Your Research - Understand the size and type of refrigerator you need to fit in the space available
Refrigerator width
The nice thing about building a DIY built-in refrigerator is the amount of flexibility you have regarding refrigerator width. You can choose a single refrigerator as narrow as 30" or stack two full size refrigerators next to each other and achieve a width up to 72" wide.


Counter Depth vs Regular Depth
There are two common types of refrigerator depths - counter depth and full depth refrigerator. Counter depth refrigerators are shallower (typically 24" or less - please note this does not include the door thickness) and give a more sleek look, but tend to have less space inside than a full-depth refrigerator. However, full-depth refrigerators have spacious interiors containing plenty of shelves and drawers, perfect for large households. The good news is that when building a DIY built in refrigerator, you may actually be able to utilize a regular depth refrigerator (more space, lower cost), but recess it back into the wall and make it look like a counter depth built in. To do this, you just need to plan ahead so there is ample depth.
Hinge Configuration / Door Thickness
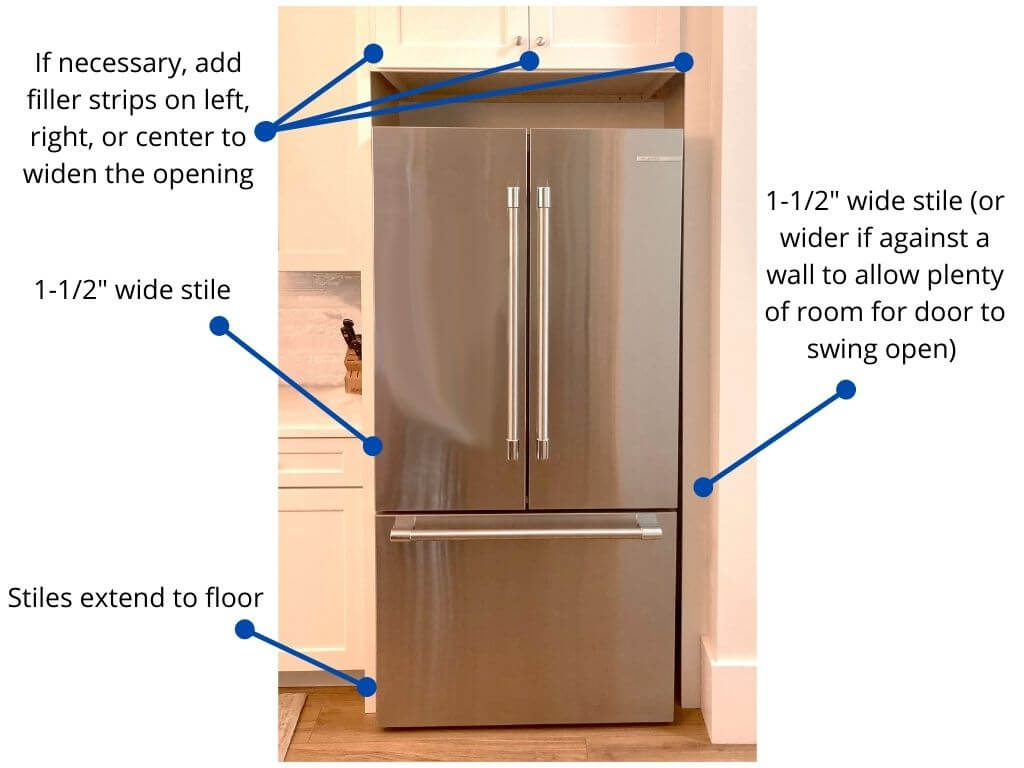
One misconception is that counter depth refrigerators sit flush with the front of the cabinets. Unfortunately, this is not the case. The doors on any freestanding refrigerator (both counter depth and regular depth) require room to swing open and therefore the doors sit "proud" of the cabinet. Some doors actually swing back into the cabinet and the only way to avoid a collision is to pull the refrigerator out of the opening until this no longer happens.
Choose your Trim Kit
So, you've picked out your shiny new refrigerator, huh? Now comes the fun part - choosing a trim kit to make it look like a high end built-in refrigerator. Don't worry, we've got some awesome options right here for you to consider!
Choose your finish: We got you covered with our fabulous finishes - brushed stainless steel, white, black, and black stainless! Not sure which one to choose? No worries, grab some free samples here, or simply reach out to us for more suggestions based on your specific make and model. Plus, if you're eyeing a stainless fridge in graphite, white, or black, give us a shout, and we might just help with those as well.
Choose your style:
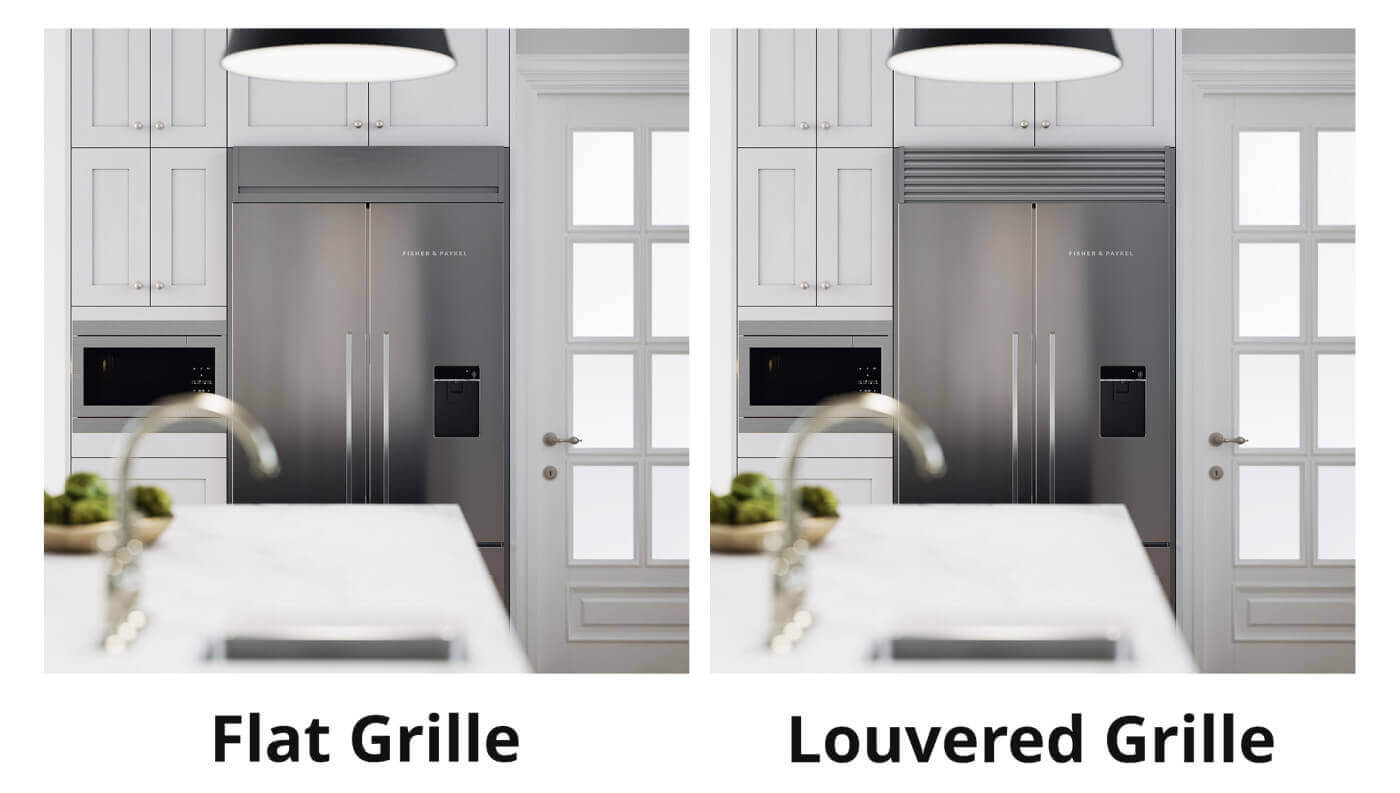
We have two snazzy grille options for the top part of your tri kit: a louvered grille with a chic louver for every inch of height, or a sleek flat grille. Choose the one that suits your taste!
Choose the mounting position of the grille:
Check out our two mounting styles - the flush mount and proud mount. Can't decide which one is for you? No problem! Take a look at these photos to see them in action. The flush mount blends smoothly with your cabinets, while the proud mount lets you slide out the top grille for a seamless refrigerator front.

Build the Refrigerator Cabinet
You've got a couple of options when it comes to measurements for your refrigerator cabinet. You can use our spec sheet and perform your own takeoffs or we can send a blueprint by sending us the make and model of your refrigerator as well as what trim kit you'd like to use.
A typical refrigerator cabinet prior to trim kit installation looks similar to the following.
Install the Trim Kit
Installing your refrigerator trim kit is a fantastic way to give your kitchen an upgraded, polished look. No need to worry, as the process is much simpler than you might imagine! With our detailed instruction videos, the task is very DIY-friendly. Installation typically only takes about 10-20 minutes and requires a few basic tools.
Congratulations! Your DIY built in refrigerator is now complete. With the information and tips in this blog post, you should be armed and ready with all the knowledge you need to add significant value to your home. You now know how to research which style and size of refrigerator fits your needs, build out the cabinet for the refrigerator, and how to pair it with a beautiful trim kit. By following these steps, you will achieve the look of a high-end kitchen at a fraction of the cost of a traditional built-in. And don't forget to keep an eye on the Instruction manual that comes with your purchase - there could be additional specific instructions based on your particular refrigerator style or installation requirements. So get out there and DIY! Have any questions about our trim kits along the way? We always available to answer all of your questions so remember that we are only a phone call away. Have fun!
FAQs
How can I achieve a built-in look with a standard refrigerator on my own?
You can achieve a built-in appearance by pairing a standard freestanding or counter-depth refrigerator with a custom stainless steel trim kit. The trim kits are DIY-friendly, require only basic tools to install, and include instructions and step-by-step videos to guide you through the process.
Do I need to build new custom cabinets to use a refrigerator trim kit?
No. If your kitchen has an existing cabinet with fixed dimensions, you can order a trim kit tailored to your current setup. If you're building new cabinets, we can provide a detailed blueprint based on your specific refrigerator model so your carpenter can build the space to the exact specifications needed.
What is the difference between a Proud Mount and a Flush Mount top grille?
A Proud Mount grille uses slotted brackets that allow it to be adjusted and extended forward (up to 4-7/8 inches) so it sits even with the face of your refrigerator doors, creating a well-integrated look. A Flush Mount grille nests closer to the cabinet, protruding only 3/4-inch from the face, with the side trim pieces acting as end caps.
How do the side trim pieces attach to my cabinets without showing hardware?
The side trim pieces attach directly to the front face of your cabinet using plastic injection-molded adhesive blocks with high-adhesion 3M VHB tape. The kit is designed with an overlap on the cabinet face, which avoids the need to drill into your cabinets, prevents small gaps, and provides flexibility during installation if your walls or cabinets are slightly out of square.
Do I have to pull my heavy refrigerator out of the cabinet to install the kit?
In most standard installations, especially if you choose the Proud Mount option, you'll need to pull the refrigerator out of the opening so the top grille can be screwed directly into the cabinet face. However, if you're unable to move the appliance, there's a face mount option available for the Flush Mount configuration, which allows the top grille to be screwed in from the sides without needing to remove the refrigerator.