
Refrigerator gap filler: How to fill the gaps around your refrigerator
You just walked into your newly finished kitchen. You look around and everything looks like it it's meant to be there...except the refrigerator. The microwave has some nice trim around it. The dishwasher and range fit nice and snug. And then there's the refrigerator. It's just sitting there sticking out like a sore thumb...as if no one had planned for it or knew it was going to be installed. As we mentioned in our post "7 Reasons to Install a Refrigerator Trim Kit in your Kitchen", one way to resolve this common issue is to fill the gaps around your refrigerator using decorative metal trim. In this post we will cover the various refrigerator gap filler options as well as installation.
**Please Note: The photos in this post are outdated. We have made several improvements to our trim kits since this article was written, including improved stainless steel and the ability to increase the louver height for taller grilles**
Quick Links
1. Should you fill in just the top gap or the top and side gaps?
2. Refrigerator gap filler options
Should you fill in just the top gap or the top and side gaps?
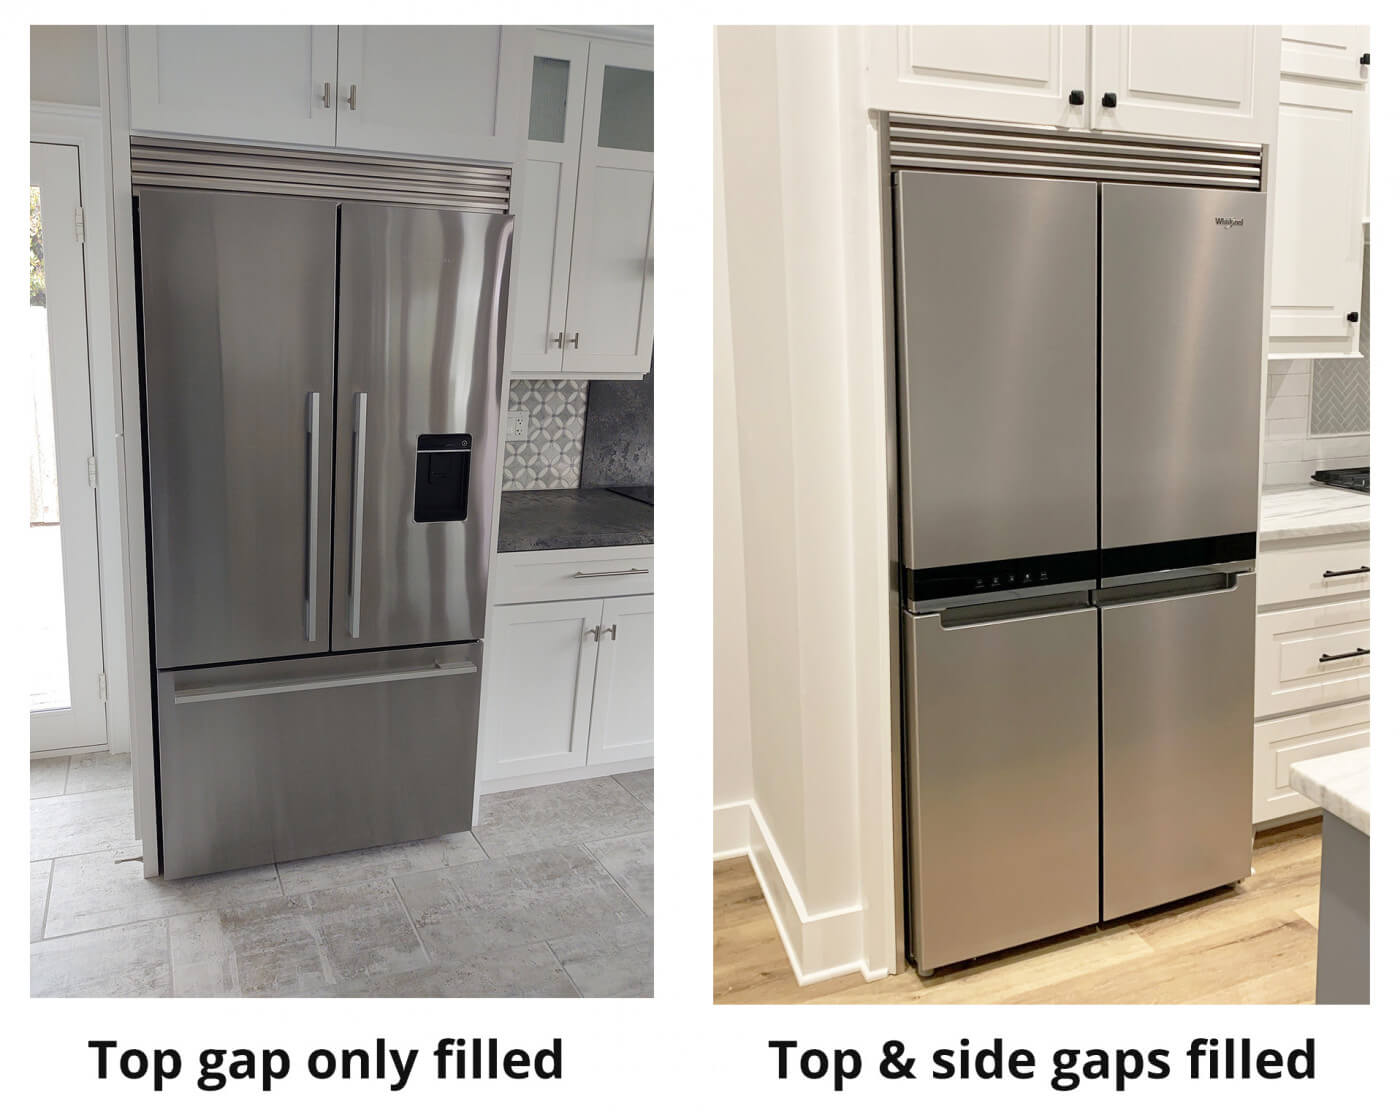
Each cabinet configuration is different, so this will depend on your unique layout. Many homeowners who have a 36" wide refrigerator cabinet will only have 1/16" or 1/8" side gaps and therefore might choose to only fill the top gap above their refrigerator. Our louvered grille can be made as short as 1-1/2" and as tall as 18", so it is a great option if you simply have a gap to fill above your refrigerator.
That being said, a question we get often is "I don't have much room on the sides, but I like the look of the full kit...is that possible?" Most likely, yes. We have changes we can make to the trim and mounting options so it fits almost any space.
One factor to consider when deciding between top trim only and full kit is price. At the time of this post, there is about $125 difference between the two options. All prices are available on the website, so if cost is a concern, be sure to check out current pricing.
Full kits (top and side trim) are definitely worth considering when side gaps are over 3/8" on each side and over 1-/2" on top. It's a great way to fill in all three gaps and make your fridge look like it was meant to be there.
Trim Options available to fill Refrigerator Gaps
Once you decide on whether you want to fill the top gap only or the top and sides, there are two primary options to consider regarding your trim.
The first is finish. In an effort to match all stainless refrigerators on the market, we offer 4 different finishes - brushed stainless steel, white, black, and black stainless. Samples can be ordered here. Alternatively, you can view our customer gallery and see which finish might match your make and model. Lastly, you can reach out to us for our opinion. Many times we have enough data and/or photos to confidently recommend which finish would work best.
The second is the mounting style. We offer a proud mount and flush mount for the top grille. Below are photos and an explanation of both. There are two things worth noting for the proud mount: 1) The front of the grille can extend up to 4-5/8"from the front of the cabinet and 2) it requires a gap height of at least 2-1/2" for our proud mount brackets to fit.

How to install a top trim piece
Regardless of whether you choose to cover the top gap or both top and sides, installation of the metal trim is straightforward and only takes a few minutes and a screwdriver. Below is a brief overview of the installation. Detailed video instructions are also sent with each of the kits.
How to mount the top grille
Option 1: Flush mount installation with a mounting lip
If you have a "mounting lip" which is 3/8" or taller, we use the bracket shown below. It installs from the backside and brings the front of the grille out flush with a 3/4" panel found on most refrigerator cabinets. To install, simply hold the trim piece in place fasten the screws from the backside as shown below.

Option 2: Flush mount installation without a mounting lip
If you do not have a mounting lip or your mounting lip is 3/8" or less, we use the method shown below. There is a an "angle bracket" which is attached to the back of the grille and extends back into the opening. Screws are then used to secure the angle bracket to the bottom of the upper cabinet.

Option 3: Proud mount installation:
For a proud mount installation, we use our slotted brackets for mounting the top grille. This allows the depth to be adjusted so it can match the front of the refrigerator doors (or anywhere in between) up to 4-5/8" from the front of the cabinet. To install, center the grille in the opening and fasten the slotted brackets to the upper cabinet as shown below.

How to mount the side trim pieces
The side trim mounting method and location depends on the top grille configuration. Below is a brief overview of each method.
Option 1: Side trim installation with a flush mount top grille and 1/4" or greater side gap
If the gap between your refrigerator and your cabinet is 1/4" or greater, we will use our standard mounting brackets. The brackets overlap into cabinet opening and are fastened into the side of the cabinet as shown below.

Option 2: Side trim installation with a flush mount top grille and less than 1/4" wide side gap
If the side gap between your refrigerator and your cabinet is less than 1/4", we will use our adhesive brackets to mount the side trim. The adhesive strips are made by 3M and very strong. To install, simply remove the film from the adhesive strip and press the side trim into place. The picture below is a top view of the side trim installation using adhesive.

Option 3: Side trim installation with proud mount grille
Due to the configuration of the proud mount grille, there is no need for the side trim to overlap the top grille. For that reason, it sits nearly flush with the face of the cabinet as shown below. To secure it to the cabinet, we use 3M industrial grade adhesive strips.

FAQs
What are my options for filling the empty gap above my refrigerator?
You can fill the top gap using a custom top grille, available in two mounting styles: the Proud Mount and the Flush Mount. The Proud Mount uses slotted brackets that allow the grille to extend outward up to 4-7/8 inches, so it sits even with the face of your refrigerator doors. The Flush Mount nests further back inside the cabinet opening, but it can be customized to extend above the cabinet opening if you need to cover extra space and add height. if some of this terminology is confusing, I completely understand. We are happy to explain further and provide photos etc. If you want to reach out to us using our contact form or email us at [email protected].
How do you fill the gaps on the sides of the refrigerator without preventing the appliance from being moved?
Side gaps are covered using custom stainless steel side trim pieces that attach to the front face of your cabinet using high-adhesion 3M VHB tape. These pieces overlap the cabinet face, but they leave a 1/8-inch to 3/16-inch functional clearance between the trim and the side of the refrigerator. This gap ensures the appliance can still be pulled in and out for cleaning or maintenance.
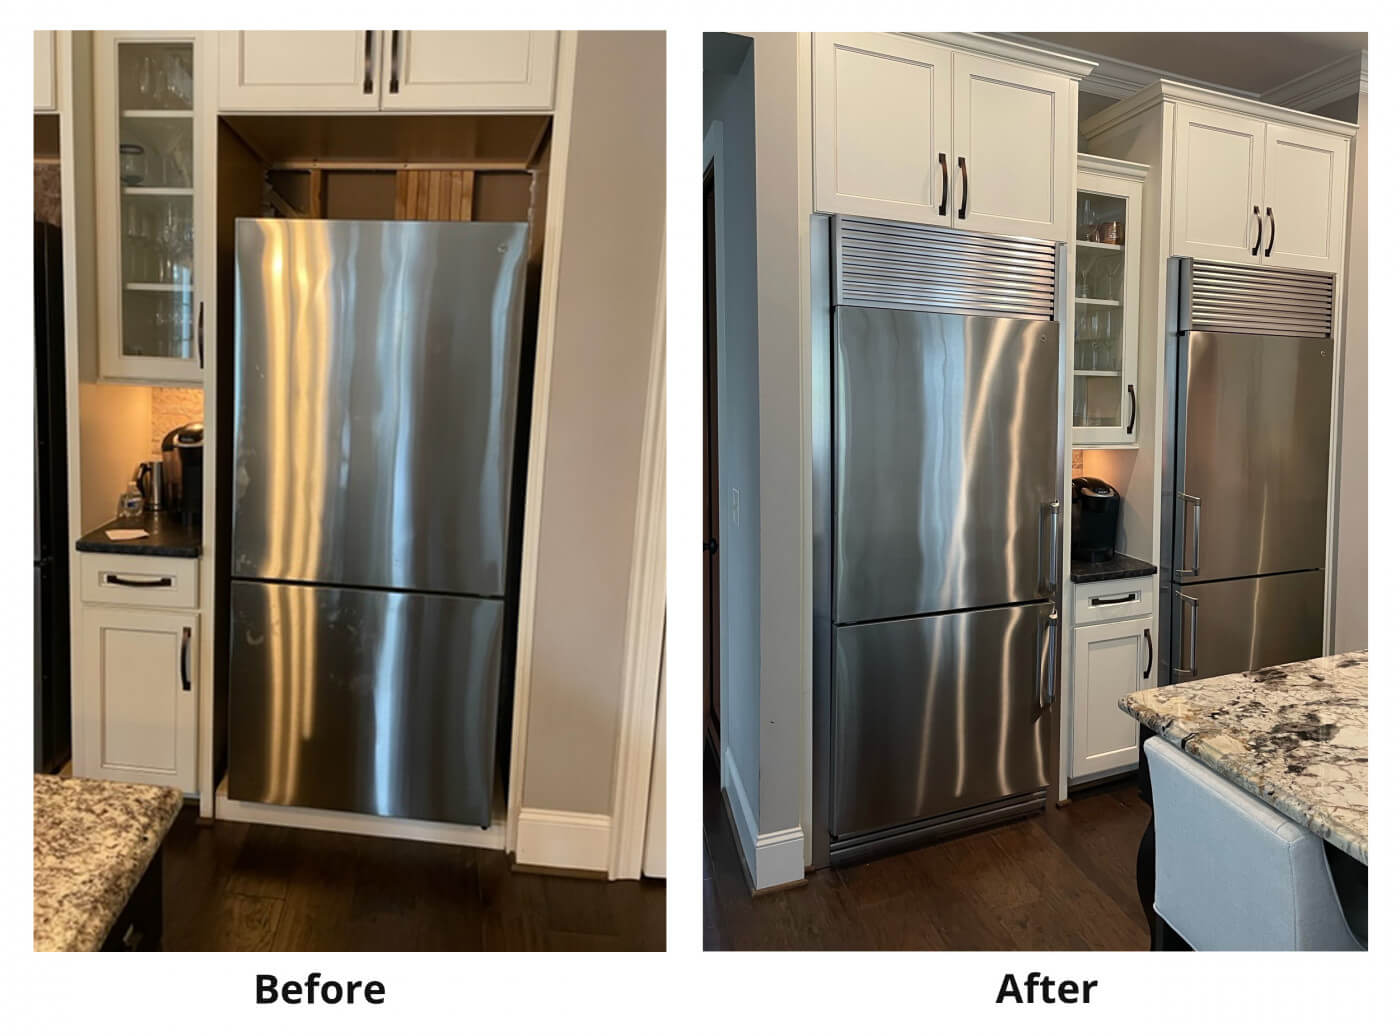
What if I have two refrigerators placed side by side, leaving a gap in the middle?
To fill the gap between two side-by-side refrigerators, you can use a center joiner piece. This is a stainless steel strip that attaches directly to the case of one of the refrigerators using adhesive, and you slide the second unit next to it. These joiners are typically offered in 3/4-inch, 1-1/2-inch, and 2-1/4-inch widths, providing room for ventilation and improving access to the inner door handles.
My refrigerator sticks out past the cabinets, and the side gaps expose the painted case. How do I fill this?
If the painted case of your refrigerator protrudes past the cabinet by 3/4-inch or less, standard side trims will cover the gap. If the case protrudes more than 3/4-inch, you should use custom stainless steel side panels instead. These panels attach directly to the painted case of the refrigerator, hiding the exposed sides so they look like a continuation of the stainless steel doors.
My refrigerator is not perfectly centered in the opening, making the side gaps uneven. Can a trim kit still fill these gaps correctly?
Yes. If your refrigerator isn't perfectly centered, you can measure both the left and right gaps, and we'll calculate the average width to use for each side trim piece. Because the side trims overlap the front of the cabinet, they provide flexibility during installation and can handle minor misalignments or slightly out-of-square cabinets.
Summary
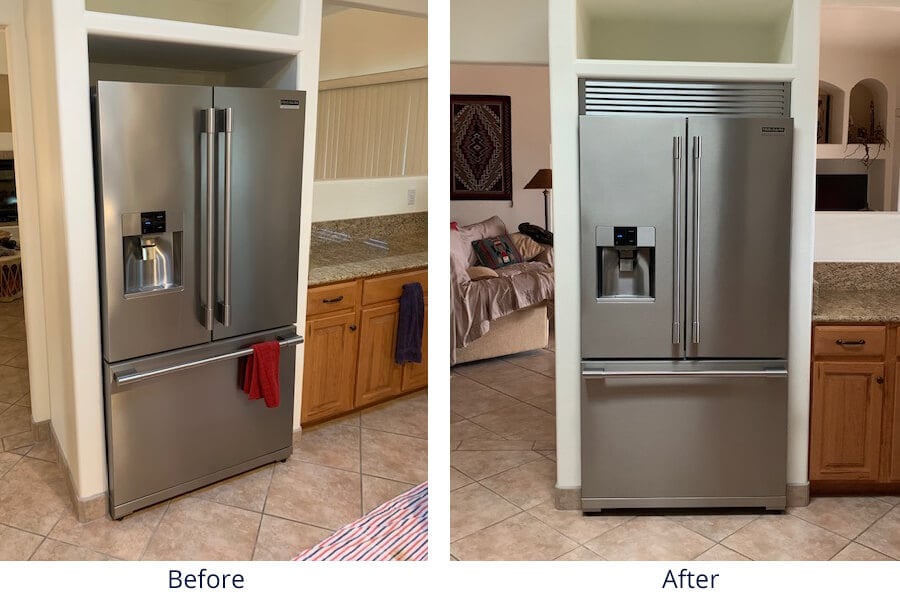
If you look at high end homes, the refrigerator is likely to look built-in with minimal gaps. Why not bring this same look to your home? It's now easier than ever with a custom refrigerator trim kit.
I hope you’ve enjoyed learning how to fill the gaps around your refrigerator. If you want to learn more about our trim kits or get help with your project, we are always here and ready to help.