
Refrigerator Cabinet Surround: How To Guide (with Dimensions)
Why This Matters
Look, nobody thinks about their refrigerator cabinet surround until something goes wrong... and trust me, fixing these problems is never cheap or easy. After seeing thousands of refrigerator cabinets, I've learned there's no standard size for refrigerator spaces. Every contractor does it differently because every kitchen is different and refrigerators keep changing.
Here's what you need to think about:
Future Flexibility: Your refrigerator won’t last forever. Over the life of your cabinets, you’ll likely go through 2-3 refrigerators. When one fails, you'll need a replacement that fits your space. Since refrigerator dimensions vary significantly (widths from 351⁄2" to 36", heights from 68" to 73", and clearances from 1⁄8" to 21⁄2"), a properly sized cabinet opening ensures you'll have plenty of options when it's time to buy new.
Proper Ventilation: Your refrigerator needs to “breathe”. Cool air gets pulled in from the bottom, travels up the back, collects heat, and exits at the top. Proper cabinet construction ensures optimal airflow and efficient operation.
Door Functionality: When reaching for that frozen pizza or pulling out a produce drawer, you need your refrigerator doors to open completely. Different refrigerators have different hinge configurations, and without proper cabinet planning, you might be unable to access the interior of your fridge entirely. This isn't just a minor inconvenience – it's a daily frustration that affects how you use one of your most essential appliances.
Depth Considerations: Counter-depth and standard-depth refrigerators require different cabinet configurations. The wrong cabinet depth can result in a refrigerator that protrudes awkwardly into your kitchen space or sits too far back, affecting both functionality and aesthetics.
Pro Tip: Fixing a poorly planned refrigerator space often costs over $1,000, but planning it correctly from the start costs nothing extra!
Quick Links:
Dimensions and Clearance Considerations
Adding a Trim Kit for a Built-in Look
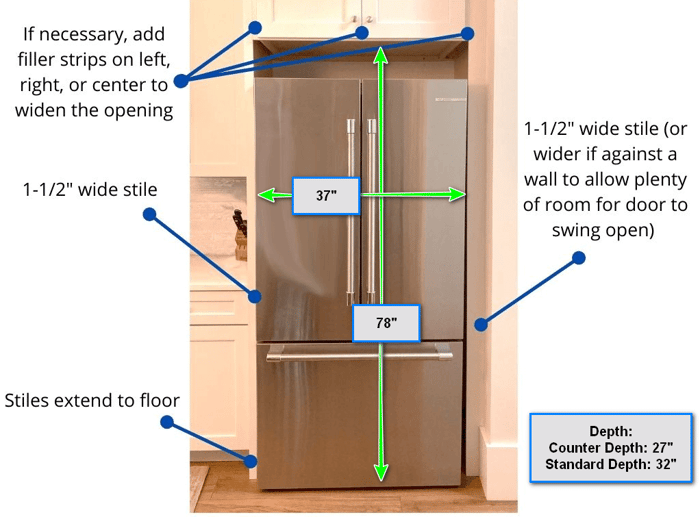
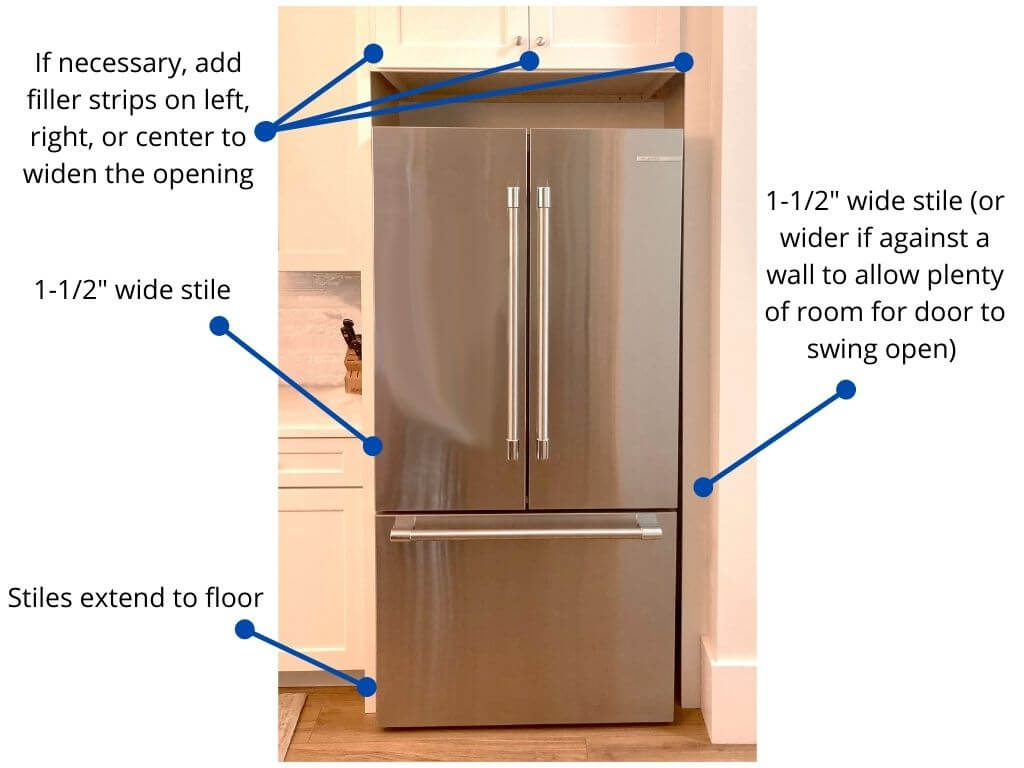
Critical Measurements Your Cabinet Needs
Height - The Most Variable Dimension
Let's look at actual refrigerator heights... you might be surprised at how much they vary. Here are some current popular models I pulled from our database: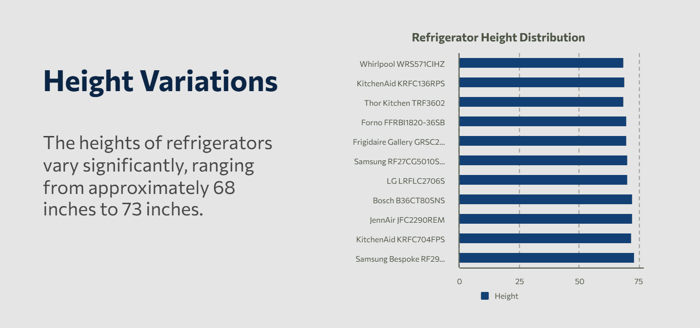
Basic Models (Under 70 inches):
Whirlpool WRS571CIHZ – 68.63"
KitchenAid KRFC136RPS – 68.875"
Thor Kitchen TRF3602 – 68.62"
Forno FFRBI1820-36SB – 69.88"
Frigidaire Gallery GRSC2352AF – 69.9"
Mid-Height Models (70-71 inches):
Samsung RF27CG5010S9/AA – 70"
LG LRFLC2706S – 70.3"
Taller Models (Over 71 inches):
Bosch B36CT80SNS – 72"
JennAir JFC2290REM – 72"
KitchenAid KRFC704FPS – 71.875"
Samsung Bespoke RF29DB9700QLAA - 73"
See what I mean about variation? That's why we recommend making your cabinet opening at least 74 inches tall... though 78 inches is even better. Think about it - your kitchen cabinets will probably outlast 2-3 refrigerators, so you want to be ready for whatever models are available when it's time for a replacement.
My recommendation: 78” refrigerator cabinet height
Width - Less Variable But Still Important
Regarding width, things are a bit more consistent... but you still need to plan carefully. Most refrigerators are between 351⁄2 to 36 inches wide, but here's what different manufacturers recommend for their cabinet openings:
Current Model Examples: Bosch B36CL80SNS:
Refrigerator Width: 35 5/8"
Recommended Cutout: 36"
KitchenAid KRFC300ESS:
Refrigerator Width: 35 3/4"
Recommended Cutout: 36 3/4"
Samsung RF29A9675:
Refrigerator Width: 35 7/8"
Recommended Cutout: 36 5/8"
Frigidaire PRFC2383AF:
Refrigerator Width: 35 9/16"
Recommended Cutout: 36 5/16"
This is why we recommend making your opening at least 37 inches wide. You want to ensure you have enough room for the fridge and proper ventilation.
My recommendation: 37” refrigerator cabinet width
Depth - A Decision You'll Live With
Let's talk about depth... because this is a choice you'll be living with for a long time. You've basically got two options here, and each one comes with its own trade-offs.
Option 1: Counter-Depth Setup
Cabinet depth: 26 inches minimum (27" is better)
Gives you that sleek, built-in look everyone loves
Less storage space (that's the trade-off)
Really popular in modern kitchens
Option 2: Standard-Depth Setup
Cabinet depth: 30 inches minimum (32" is ideal)
Maximum storage space
Better value per cubic foot
Will stick out past your countertops a bit
Here's the thing about depth... once you build your cabinet, you're locked in. Sure, you can put a counter-depth fridge in a standard-depth cabinet, but you can't do it the other way around. So think about what matters most - that sleek look or maximum storage space.
Pro Tip: Want the best of both worlds? If your kitchen layout allows it, consider recessing your refrigerator cabinet into the wall behind it. This way, you’ll get that sleek counter-depth look but keep all the storage space of a standard-depth fridge.
My recommendation: 27” depth for counter depth refrigerator cabinet and 32” depth for standard depth refrigerator cabinet
Door Swing - The Often Forgotten Detail
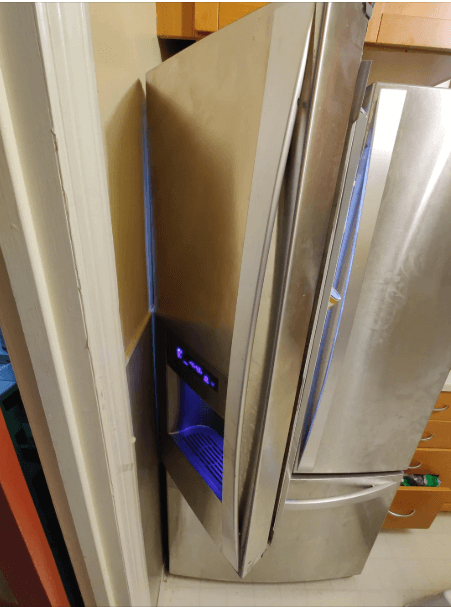
This is one of the most common oversights I see when I review refrigerator cabinets. The width of your cabinet opening isn't the main thing determining if your doors will open properly. What matters is how close your fridge is to any walls next to it.
Think about trying to open your car door when you're parked too close to a wall... same idea with your fridge. Some refrigerator doors need up to 11 inches of clearance from a side wall to open fully to 120 degrees. Even those units with "zero clearance" hinges still need space to open. The reason is that when the door only opens to 90 degrees, it does not allow the drawers to be pulled out and fully accessed or for large items such as pizzas, etc, to be removed without interfering with the internal components of the door.
Bosh 800 Series door swing requirements
My recommendation:
If possible, avoid putting your refrigerator next to a wall, but if you decide to go this route, below are the recommended clearances.
If you plan to place your refrigerator next to a full-depth wall (one that extends the entire fridge depth), aim to position the wall at least 12 inches away from your refrigerator cabinet. This provides adequate clearance for most refrigerator models to fully open their doors, allowing complete access to drawers and compartments.
However, if you're working with a partial-depth wall (one that only extends partway), take the time to visit your local appliance showroom and test different models. Open the doors fully and observe how much space they need – this hands-on approach is the most reliable way to determine exactly how much clearance you'll need for your specific situation. Remember, different refrigerator models have varying hinge designs and door swing patterns, so what works for one may not work for another. Once you determine the clearance requirements, add a few inches to accommodate future refrigerators.
Managing Gaps - Making It Look Good
After reading this post, you might think, "Okay, I understand why I need to build an oversized refrigerator cabinet, but what about those unsightly gaps?" That's where our refrigerator trim kits come in. These sleek, stainless steel trim pieces transform those necessary gaps into a polished, professional finish that mimics the look of high-end built-in refrigerators costing $8,000-$14,000. Combining an appropriately sized cabinet with our trim kit gives you the best of both worlds – the flexibility to choose from hundreds of refrigerator models when it's time for replacement, proper clearance for ventilation and door operation, and a stunning built-in appearance that enhances your kitchen's value.
Here's what you'll gain:
Future Flexibility - Choose from hundreds of refrigerator models when it's time for replacement
High-End Look - Achieve the appearance of expensive built-in refrigerators at a fraction of the cost
Proper Ventilation - Maintain optimal airflow for efficient operation and longer appliance life
Full Functionality - Ensure doors can open completely for easy access to drawers and compartments
Enhanced Home Value - Add a premium touch that appeals to future buyers
Cost Savings - Avoid expensive cabinet modifications or being forced into costly built-in models later
Professional Finish - Transform practical refrigerator gaps into a sleek, intentional design element
It's a simple solution that turns practical necessity into a design advantage.
Your Action Plan - Putting It All Together
Think of planning your refrigerator space like building a garage for the next 20 years - you need room not just for today's car, but for whatever you might buy in the future. You may have a compact car now, but what if you need an SUV later?
Here's a summary of my recommendations:
1. Height: 78”
2. Width: 37”
3. Depth:
Counter-depth: 27 inches
Standard-depth: 32 inches
4. Door clearance: Varies by wall depth and refrigerator model.
5. Trim: Consider how to handle gaps
Remember: The time you spend planning now will save you headaches (and money!) later. A properly planned refrigerator space makes your kitchen work better and look great. Plus, when it's time to replace your fridge years from now, you'll have plenty of options to choose from.
And if you need some inspiration, check out these refrigerator cabinet surround ideas.

Cabinet Surround Components
The components of a refrigerator cabinet are pretty straightforward. You will have two side panels and an upper cabinet. The side panels are typically 3/4" thick plywood with edge banding on the front or 3/4" plywood with stiles on the front.


The upper cabinet typically consists of cabinet box with two doors on the front. The cabinet box can either full depth (same depth as the refrigerator cabinet) or shallow (not as deep as refrigerator cabinet). A lot of homeowners opt for the shallow options since retrieving items can be difficult in a full depth cabinet.

You may need to add filler strips to the overhead cabinet in order to achieve the desired width.

Wooden "cleats" are used to brace the panels together during assembly and installation. We recommend two or three which can be precut and drilled with pocket holes for easy attachment during assembly.

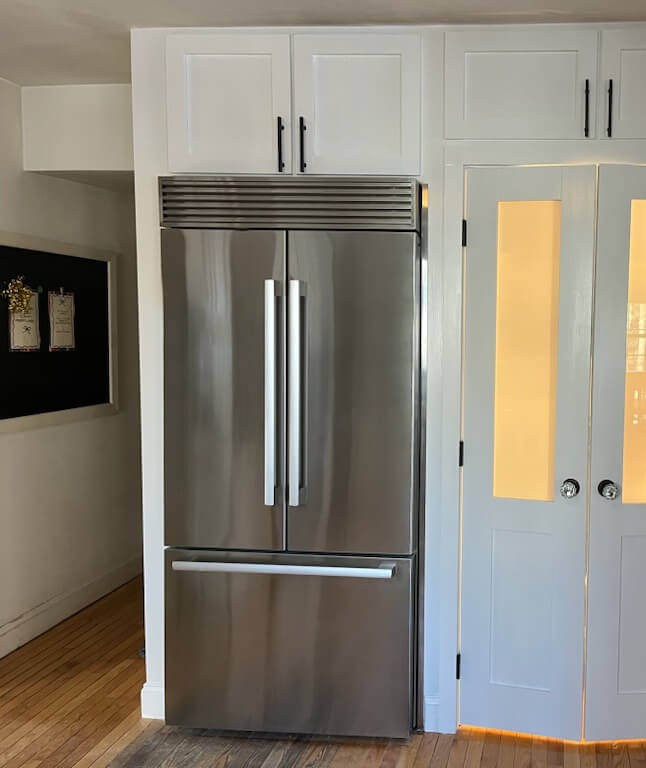
A fully assembled refrigerator cabinet surround can be seen below.
How to Assemble
Standing up a fully assembled refrigerator surround cabinet inside the kitchen can be a challenge. Often times it is impossible to do so without hitting the ceiling. For that reason, we recommend assembling the cabinet once all of the components have been moved into the kitchen. Having two people is helpful, as some of the components are bulky and heavy.
1. Stand up the side panels
2. Secure them to one another using cleats
3. Install overhead cabinet
4. Attach crown molding or baseboard (optional)
5. Paint / Finish to match surround cabinets
Adding a Trim Kit for a Built-in Look
If you are looking for a simple way to take your new refrigerator cabinet surround to the next level, consider adding a sleek stainless steel trim kit. This option has several benefits worth considering.
Congratulations, you’ve now come to the end of our guide! With an understanding of the dimensions and clearances necessary to build a refrigerator cabinet surround, along with knowledge of its components and how to assemble them, you can now tackle this project with confidence. But don’t forget about finishing it off – adding a stainless steel trim kit can take it to the next level. You may need one or two additional hands when installing it, but the effort will be worth it in order to give your kitchen the built-in look you've been dreaming of! So don't delay – find and shop for your trim kits today, and start making those dreams come true. Good luck!
Shop Refrigerator Trim Kit
FAQs
How deep should I build my refrigerator cabinet surround?
Your cabinet depth needs to be greater than the refrigerator depth so the painted case is hidden. For new cabinet construction, we recommend a minimum depth of 26 inches for counter-depth refrigerators, and 32 inches for regular-depth models.
How much space should I leave at the top of the cabinet opening?
For new cabinet construction, we typically recommend leaving a gap of 8 inches at the top. This provides enough room for proper ventilation and space to install a custom louvered or slotted top grille.
How can I build my cabinet so it will fit other freestanding refrigerators in the future?
To give yourself the most flexibility, we recommend using a placeholder measurement — such as 76-78 inches tall and 37 inches wide. Planning your cabinet dimensions around this placeholder ensures your surround will accommodate most standard freestanding refrigerators on the market.
How much clearance is left between the trim kit and the refrigerator?
We design the kit to leave a 1/8-inch to 3/16-inch functional clearance between the top and sides of the refrigerator and the trim pieces. This gap ensures the appliance has room to move and can be pulled in and out for cleaning or maintenance.
How much of the cabinet face does the side trim cover?
The side trim pieces are designed to overlap the front face of your cabinet. This overlap gives you a flat surface to attach the trim using high-adhesion 3M VHB tape and provides flexibility during installation in case your cabinets or refrigerator are slightly out of square.